Author Archives: Chestnut Hill Nursery

Seed Starting

Starting seeds indoors is a rewarding gardening experience and can help extend your growing season to include more plant varieties than your outdoor season may permit. Furthermore, a larger selection of seed varieties doesn’t limit your opportunities to growing only those transplants that are available at planting time. The key to success in growing seedlings is in creating the proper environment.

What Seeds Need

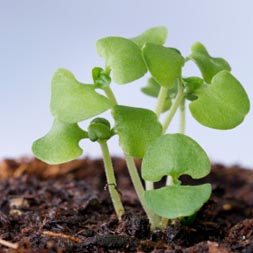
Seeds are generally hardy, but to start them properly they do need gentle nurturing so they can produce healthy, vibrant plants. In general, seeds should be started 4-6 weeks before the recommended planting time so the seedlings will be large and strong enough to withstand the stresses of transplanting. Use a sterile growing mix which is light enough to encourage rich root growth. Sow the seeds thinly and cover lightly with sphagnum peat moss. Water using a fine spray but do not soak the seeds – they also need oxygen to germinate, and if they are overwatered they will drown. Cover the container with clear plastic to hold the moisture and increase humidity. Place the containers in a warm (70-80 degrees) spot and watch daily for germination. The top of the refrigerator is often an ideal location. When the first seeds germinate, place the seedlings in bright light or under artificial lights (tube lights should be 2-3” from seedling tops) for several hours each day, since late winter sunlight will not usually be sufficient to prevent weak, leggy seedlings. Daytime temperatures should range from 70-75 degrees. Night time temperatures should range from 60-65 degrees.

As Seeds Grow

When the seedlings develop their first true sets of leaves, add half-strength water soluble fertilizer to their water – organic fish emulsion or seaweed fertilizers are great to use. Repeat every second week to provide good nourishment. Thin the seedlings or transplant them to larger containers as they grow. Before planting outdoors, harden-off the plants at least one week before the planting date. Take the transplants outdoors in the daytime and bring them in at night if frost is likely. Gradually expose them to lower temperatures and more sunlight. The use of hotcaps and frost blankets to cover early plantings will also aid in the hardening off process so the seedlings can adjust well to their new outdoor environment.

Transplanting Seeds

Transplant seedlings into the garden after the safe planting date on a calm, overcast day. Pack the soil around the transplant with as little root disturbance as possible. Sprinkle the plants with water, keeping the soil moist until the plants become established.

Popular Indoor Seed Start Dates

The exact dates you want to start seeds will vary depending on your local growing season, the varieties of plants you choose and what their needs are. In general, dates for the most popular produce include…

Vegetable Seed Starting Dates

  • February – Asparagus, celery, onion
  • March 1 – Broccoli, Brussels sprouts, cabbage, cauliflower, collards, kale, lettuce
  • March 15 – Eggplant, peppers, tomatoes
  • April 1 – Summer squash
  • April 15 – Cantaloupes, cucumbers, winter squash

Flower Seed Starting Dates

  • January/February – Begonia, carnation, geranium, impatiens, nicotiana, pansy, rudbeckia, salvia, snapdragon, verbena, vinca
  • March 1 – Ageratum, dahlia, dianthus, petunia
  • April 15 – Aster, calendula, celosia, marigold, zinnia

Use seed starting dates as a general guide to ensure your seeds have plenty of time to reach their full harvest potential before the weather turns in autumn. At the same time, consider staggering seed starting every few days to lengthen your harvest and keep your favorite vegetables and flowers coming even longer during the growing season. As you gain more experience with starting seeds, you’ll be able to carefully plan your seed calendar to ensure a lush, rich, long harvest season.

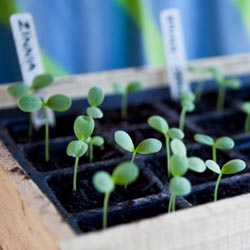
Old wooden seed tray with plant seedlings of various kinds (Zinnia and Pea).

Winter Vegetables on the Table

Winter marks a seasonal change. Our bodies seem to crave deeper, more tantalizing, richer tastes rather than light, bright, fruity flavors of summer. Harvesting vegetables in the late fall, and sometimes into the winter, presents us with bounty for slow, simple and savory cooking. All winter vegetables may be boiled, roasted, grilled, stewed, sautéed, steamed or eaten raw.

Which Vegetables Are Winter Vegetables?

Winter vegetables are generally considered those that are either harvested late in the season or have the capability of being kept for several weeks or months without losing their flavor, texture and nutritional value. Which of these will grace your table?

The cole, or cruciferous, vegetables such as broccoli, Brussels sprouts, cabbage, cauliflower, turnips and kohlrabi rank highly for many nutrients including vitamin C, soluble fiber and other nutrients with anticancer properties. Interestingly, boiling seems to reduce the potency of these nutrients, but other cooking methods don’t.

Root crops, including beets and carrots, sustain life around the world. Beets provide folate, nitrates and manganese in dishes such as borscht and pickled beets. Carrots contain diverse vitamins including A, C, K and B6 and antioxidants from carotenoids. Interestingly, recent research suggests many people prefer the flavor of steamed carrots to boiled.

Fennel, with its anise flavor, jazzes up meals throughout the world but is a favorite in Mediterranean and Italian cuisine. It tops nutritional lists with its antioxidant benefits. Try some raw in salads and appetizers.

Celery, related to fennel, adds a distinctive crunch when used in salads as a raw ingredient or a stronger flavor to soups and stews. With a mild taste, celery is versatile in a wide range of dishes, including mashes, stuffings and roasts.

Potatoes and sweet potatoes, long associated with the typical American holiday meal, contain many healthful benefits. According to research, boiling or steaming sweet potato provides the most health benefits; the phytochemicals in them rival that of broccoli. Roasting or baking potatoes is a healthy way to enjoy them, provided you are sparing with the toppings.

Winter squashes, from acorn to pumpkins, also serve as healthy sources of carbohydrates. Because 90 percent of the calories are starch-related, people are surprised at recent studies proving the antioxidant, anti-inflammatory and insulin-regulating effects of winter squash. Additionally, the roasted seeds make a delicious and healthful snack.

Winter Vegetable Recipes to Savor

Have you ever wondered how to roast vegetables? It’s easy! Just wash the vegetables, cut into 1″x1″ cubes, and place in mixing bowl. Drizzle over a few tablespoons extra virgin olive oil and mix to cover all pieces. Place as a single layer in a cookie or roasting pan. Sprinkle with salt and pepper and cook at 375⁰ Fahrenheit for approximately 45 minutes or until the desired texture is reached. Jazz it up with cinnamon, garlic, curry, rosemary or any other favorite spice or seasoning mix.

Here are some other recipes to bring these wonderful winter vegetables to your table. Bon appétit!

Roasted Winter Squash Seed and Cheese Ball Appetizer

Step 1: Roast winter squash seeds by cutting the winter squash in half and removing the seeds and stringy “gunk.” Put into a bowl half filled with water and rub between your hands to separate the seeds from the strings. Rinse the seeds again and spread out on a cookie sheet. Use a hair dryer or place in 150⁰ Fahrenheit oven to dry. Stirring every 10 minutes reduces drying time and ensures even drying.

Step 2: When dry, place seeds in bowl and combine with choice of seasonings. Mix thoroughly. Return to cookie sheet. Place in 275⁰ Fahrenheit oven for 10-20 minutes. Watch closely to prevent burning. When cool, chop finely to coat cheese ball.

Seasoning ideas

  1. Latino: 4 Tbs. melted butter, 2 tsp. chili powder, 1 tsp. oregano
  2. Asian: 4 Tbs. melted butter, 2 tsp. ground ginger, 1 tsp. hot mustard, 1 tsp. honey
  3. Holiday: 4 Tbs. melted butter, 2 tsp. cinnamon, 1 tsp. nutmeg, 2 tsp. sugar
  4. Use your imagination!

Step 3: Make cheese ball.

Ingredients:

2 pkg. (8 oz. each) softened Neufchatel cheese

1/2 cup shredded sharp cheddar cheese (Low fat)

Directions:

Beat Neufchatel and cheddar in small bowl with mixer until well blended. Refrigerate 1 hour. Shape into ball. Press seasoned winter squash seeds onto cheese ball.

Serve with complimentary crackers, tortilla chips, pretzels or flatbread.

Winter Squash Casserole

(serves 2)

Ingredients:

2 Cups winter squash, peeled and cut into 1-inch cubes

3 Tbs. extra virgin olive or macadamia nut oil

1 tsp. orange juice

1 tsp. lemon juice

Directions:

Steam squash chunks, covered, for 7-8 minutes, until just tender

Mix remaining ingredients, pour over squash in bowl

Toss while still warm. Serve.

Other Ideas:

  • Cook 1/2 C chopped onion with squash, or
  • Add fresh herbs such as basil or rosemary to liquid dressing, or
  • Sweeten with 1 tsp. cinnamon and 2 tsp. honey, or
  • For Asian flavoring, add 1 Tbs. minced fresh ginger, 2 tsp. soy sauce

Super Easy Grilled (or Baked) Cauliflower

  1. Remove the leaves. Cut the head in two, core the stem. Place both on large piece of heavy-duty foil.
  2. Melt 1/2 Cup butter with 2 tsp. garlic salt and 2 tsp. lemon pepper.
  3. Drizzle half of butter mixture over each half and sprinkle each with 3 Tbs. parmesan cheese
  4. Rejoin the two halves and drizzle remaining butter mixture on the outside.
  5. Fold foil around, creating a ball.

Cook at 350⁰ Fahrenheit for approximately an hour or until soft. Delicious!

Tropical Outdoor Living Room

This year, discover the pleasure of tropical plants by transforming your courtyard, balcony, flat roof or deck into a wonderland oasis. If you haven’t experienced the hot colors and unusual textures of plants like mandevilla, dipladenia, stephanotis, passion vine, bouganvillea, oleander, hibiscus, lantana and Pandora’s vine, you’re in for a treat!

Growing Tropical Plants

Tropical plants can be grown in pots and planters almost anywhere, providing they get at least 6 hours of sun daily. Fertilize them weekly with Jack’s Classic Blossom Booster and keep the soil evenly moist. Spray every 10-14 days with a light concentration of Bonide All-Season Oil Spray to control insects like mealybugs, aphids and scale. Check for each individual plant’s needs for proper fertilization, space and other care, and you’ll discover that tropical plants are no more difficult to care for than any container garden.

Creating Tropical Arrangements

Tropical plants can pack a punch by themselves, but they look even more lush and paradise-like in thoughtful arrangements. Go for the filler-thriller-spiller formula when planning a tropical container, and choose plants with good contrasting colors and unique foliage to make the most of every combination. To help the plants “pop” in the arrangements, opt for more understated, neutral pot or container colors, and let the vibrancy of the plants shine through.

More Tips for a Tropical Outdoor Living Room

To give your outdoor living space a truly tropical feel…

  • Use wicker, bamboo or similar tropical materials for outdoor furniture, topping chairs and loungers with bold patterns and bright colors for a tropical vibe.
  • Use louvered shutters to enclose a shady spot but still catch breezes, and go for a beachy look with driftwood-esque stains and finishes.
  • Add torches or lanterns for ambient lighting, or add a touch of whimsy with a string of lights with tropical themes, such as palm trees or flip flops.
  • Add cute tropical flair to the yard with a lawn flamingo, seashell fountain, teal gazing ball or similar decorative accents. Pineapple, flamingo, nautical and beach themes are popular.
  • Include a water feature if possible for that splashing wave sound. A tabletop fountain or even a sound machine can create a similar tropical ambiance to enjoy.
  • Serve up the tropics with beachy beverages, fresh fruit and themed appetizers whenever you entertain in your tropical outdoor living space.

No matter where your garden may be, you can add a touch of the tropics when you plan a fun and inviting tropical outdoor living room.

tropicaloutdoor1

tropicaloutdoor2

Lyme Disease

For those of us who work and play outdoors in deer tick-infested areas, Lyme disease is a reality. If caught early, the disease is usually cured with antibiotics. If not detected and treated early, Lyme disease can be a debilitating condition that may linger for months or years.

Lyme disease is transmitted through the bite of a deer tick. The tick becomes infected with the disease by biting an animal that is carrying the bacteria. The main culprits in our area are the white-tailed deer and white-footed mouse. Not every deer tick is a carrier of Lyme disease but it is wise to always take precautions to prevent potential infections.

Protect yourself and your family by:

  • Wearing light-colored clothes to help spot and identify deer ticks before they attach to spread the infection.
  • Wearing long sleeves and pants to minimize exposed skin that can attract deer ticks. Tuck your pants into your boots or socks. Include a hat for added protection.
  • Spraying exposed skin with a product that contains at least 20 percent DEET and spraying clothing, and all other cloth gear, with a product containing Permethrin. Always follow the product label when applying repellents.
  • Removing clothing and immediately laundering it when coming back indoors. Dry clothing at a high temperature for at least 30 minutes, since ticks are sensitive to dryness and will die quickly without appropriate moisture.
  • Showering immediately and thoroughly after being in a tick-prone area. Inspect all skin surfaces, especially hard-to-see areas like behind the knees, the back of the neck and in arm pits. Ticks that carry Lyme disease are very small and therefore hard to see. Ticks must be attached for at least 18 hours in order to transmit Lyme disease.
  • Protecting pets from ticks with appropriate collars, drops, powders or dips, and inspecting pets’ fur regularly for ticks or other pests.

Protect your yard by:

  • Mowing the grass regularly. Ticks thrive in longer grasses with moist soils, but are not as abundant in groomed areas.
  • Keeping leaves raked and keeping the yard free of refuse that can create moist patches in the soil where ticks will thrive.
  • Creating a protective barrier, at least 3-4 feet wide of mulch or stone, between yard and wooded area. Ticks are not easily able to cross these open areas.
  • Stacking wood neatly in a dry area where it is less likely to harbor a tick infestation.
  • Spraying your yard with a tick control product like bifenthin. Always follow the product label when applying pesticides.
  • Taking steps to discourage deer and mice in your yard, such as choosing deer-resistant plants and using traps responsibly to eliminate rodents.

By taking appropriate precautions to protect you, your family and your yard, you can minimize any risk of contracting Lyme disease.

mow